

Based on the Nasa INSPIRE VLF-3 receiver. All Gerber files, schematic and Kicad files:
Parts list:
C1         24pF
C10        10uF
C11        .1uF
C12        1uF
C13        10uF
C14        330uF
C15        10uF
C16        100uF
C17        1uF
C18        .1uF
C19        330uF
C2         .01uF
C3         .1uF
C4         0.01uF
C5         0.01uF
C6         .1uF
C7         .001uF
C8         .001uF
C9         .1uF
D1         3v zener DIODE
D2         3v zener DIODE
K1         CONN_3 [headphone out]
L1         3.9mH
L2         150mH
P1         CONN_1 [antenna]
P2         CONN_2 [power]
Q1         FET_N (2SK170)
Q2         NPN (2N2222)
R1         22M
R10        20K
R11        10K
R12        15K
R13        270K
R14        1K
R15        10
R16        100
R17        100
R18        470
R19        220
R2         220
R20        10k
R3         220
R4         43K
R5         100
R6         2.2K
R7         2.2K
R8         100K
R9         20K
RV1        10K
U1         LM358
U2         LM386
Recordings to follow. Also to be filed under EM resources.
Further ELF/VLF links:
VLF audio stream: http://www.spaceweather.com/glossary/inspire.html
VLF listener's handbook: http://www.auroralchorus.com/vlfhndbk.htm
http://www.home.pon.net/785/equipment/build_your_own.htm
http://www.vlf.it/fft_beginners/fft_beginners.html
http://istp.gsfc.nasa.gov/istp/polar/polar_pwi_descs.html
http://www-star.stanford.edu/~vlf/ulp_reciv/ulp.htm
http://www.home.pon.net/785/equipment/homemade_b-field_receiver.htm
http://www.da4e.nl/elfspecial.html
1] Building and testing GNU Radio (Debian testing):
svn co http://gnuradio.org/svn/gnuradio/trunk gnuradio

apt-get install libtool portaudio19-dev alsa-dev alsa-source python-wxgtk2.6 python-numpy

export PYTHONPATH=/usr/local/lib/python2.4/site-packages/

./bootstrap

./configure

make install

ldconfig

cd ~/gnuradio/gnuradio-examples/python/audio

./audio_fft.py -I hw:0,0 -S
References:
GNU Radio tutorials: http://www.nd.edu/~jnl/sdr/docs/tutorials/1.pdf
http://www.spectrum.ieee.org/oct06/4654/toolsb1
http://www.kd7lmo.net/ground_gnuradio.html
SDR: http://f4dan.free.fr/sdr_eng.html
2] Demodulation using Baudline:
Ref: http://www.domenech.org/homebrew-sdr/receiver-3.htm
http://www.baudline.com/manual/glossary.html
http://www.burtonmackenzie.com/2007/05/poor-mans-spectrum-analyzer.html
http://www.febo.com/pages/baudline/
Use of decimate and down-mixer:
Down-mixer allows us to move across frequency range down-sampling.
What is decimation?
"a technique for reducing the number of samples in a discrete-time signal."
Play deck window - advanced features: high pass and low pass filters, use of shift for demodulation.
3] ITC/EVP ref:
EM related: http://members.tripod.com/:/Article1.htm

Simple design based on Analog Device's AD8313 chip, providing visual display of broadband signal strength and audio level output of demodulated signal.
The circuit detects, demodulates the amplitude and amplifies high frequency electromagnetic emissions (100 MHz to 2.5 GHz approx) for audio frequency output. The main component is the Analog Devices AD8313 IC: RF logarithmic detector and controller, whose output is further amplified by the TL082 op-amp.
Circuit diagram:

Or: http://1010.co.uk/images/rssi_strength.pdf
PCB and all Kicad/GERBER files:
http://1010.co.uk/rssi_strength.tar.gz
References:
http://f6bon.albert.free.fr/Milliwattmetre.html
http://www.analog.com/en/prod/0,,759_847_AD8313,00.html
http://www.turnpoint.net/wireless/cantennahowto.html
http://www.engadget.com/2005/11/15/how-to-build-a-wifi-biquad-dish-antenna/
avrdude -c avrusb500 -p m8 -P /dev/ttyUSB0 -U lfuse:w:0xFF:m -U hfuse:w:0xDF:m -U flash:w:main.hex

PCB: http://1010.co.uk/images/noise2-smaller-Component.pdf
Layout: 

In GNU Emacs:
1] M-x octave mode
2] Use C-c TAB C-l to evaluate the last Octave statement (eg. help)
[also used to start the inferior Octave process which we can interact with in the other window/frame.]
3] Ctrl-up-arrow/down-arrow to cycle through history at Octave prompt.
4] Opening a file as raw 8 bit character (unsigned) and plotting a histogram of values:
myfile = fopen("testrnd_delay_none", "r+")

x =fread(myfile, "uchar");

hist(x)

hist(x(1:50))

plot(x)

fclose(myfile)
3] Help/info issues:
At first there were some problems with help/GNU info in Emacs with Octave. These were solved with:
(require 'octave-hlp) (in Emacs)

and

apt-get install octave3.0-info
1] Remembrance engine revisited:
ra-index -v ~/experiment/RA-indexes/svn ~/svn_test/trunk

;; in .emacs:

(load "remem.el")
(setq remem-prog-dir "/usr/bin")
(setq remem-database-dir "~/experiment/RA-indexes")
(setq remem-scopes-list '(("svn" 6 5 500) ("experiment" 6 5 500)))
;;(setq remem-terminal-mode t)
(setq remem-load-original-suggestion  nil)


C-c r t - toggle

C-c r [number] see numbered suggestion

C-c r
2] Transparent version control using SVNAutoversioning and davfs// simple recipe:
In httpd.conf:

<Location /repos>
  DAV svn
  SVNPath /root/svnrepo
  SVNAutoversioning on
</Location>

Making sure that we link:

ln -s ../mods-available/dav_fs.load .

and other dav stuff into mods-enabled

// restart apache and test access in browser 127.0.0.1/repos/

Some play with repo permissions and finally:

mount.davfs -o uid=xxxxx,gid=users,rw,no_netdev http://127.0.0.1/repos/ /dav
Code updated (bug in serial code produced extra carriage returns 0x0d.
http://1010.co.uk/noise_ser1.c
and a different scheme for unbiasing (for the moment without XOR of alternate ones and zeroes).
Using baudline for quick histogram and raw file analysis:
http://www.baudline.com/manual/open_file.html
1] input -> open file -> format raw
2] set options and make use of
Test results under ent:
http://www.fourmilab.ch/random/
Entropy = 7.997799 bits per byte.

Optimum compression would reduce the size
of this 84058 byte file by 0 percent.

Chi square distribution for 84058 samples is 257.79, and randomly
would exceed this value 43.93 percent of the times.

Arithmetic mean value of data bytes is 127.5481 (127.5 = random).
Monte Carlo value for Pi is 3.127132558 (error 0.46 percent).
Serial correlation coefficient is -0.000152 (totally uncorrelated =
0.0).
Further Links:
http://warmcat.com/_wp/2007/11/07/adding-entropy-to-devrandom/
http://www.stat.fsu.edu/pub/diehard/
http://www.freewebs.com/pmutaf/iwrandom.html
http://www.robertnz.net/hwrng.htm
http://pheatt.emporia.edu/projects/hardwareRNG/index.html


Based on designs in white noise workshops and on:
http://www.cryogenius.com/hardware/rng/
and:
http://robseward.com/itp/adv_tech/random_generator/
Schematic:
http://1010.co.uk/images/noise2.pdf
PCB:
http://1010.co.uk/images/noise2-Component.pdf
Code:
[Also as reference for avr-gcc/ATmega8 analogue signal input and serial R/TX]
http://1010.co.uk/noise_ser1.c
Notes:
Reverse-biasing of a 2n3904 transistor across 20V (produced by MAX232), generates avalanche noise which is amplified by one more transistor and further amplified and transformed into a square wave by Schmitt trigger 74HC14. This signal is sampled as a 1 or 0 by the digital input of an ATmega8. The sample is unbiased after Von Neuman and accumulated towards a single byte which is transmitted to the PC by way of USB/serial interface (FT232RL).
Testing:
Using dieharder from:
http://www.phy.duke.edu/~rgb/General/dieharder.php
cat /dev/ttyUSB1 > testrnd

dieharder -a -f testrnd -g 66
Simple HID using the ATmega8:
1] After:
http://sensorwiki.org/index.php/Building_a_USB_sensor_interface
and:
http://www.flightsim.com/cgi/kds?$=main/howto/mind.htm
digraph stack {
        compound=true;
        ranksep=0.25;
        label="Life coding and encapsulation...";

        node [shape=plaintext, fontsize=16];

        bgcolor=white;

	W[label="1] W.A.S.T.E - an appearance", shape=box, style=filled, color=crimson, width=4]
	A[label="2] ALICE - the obvious", shape=box, style=filled, color=pink, width=5]
	F[label="3] FOREST - CPU/bound", shape=box, style=filled, color=goldenrod2, width=6]
	C[label="4] CHICKEN - self reference", shape=box, style=filled, color=lemonchiffon1, width=7]
	I[label="5] ISLAND - sheep", shape=box, style=filled, color=green2, width=8]
	V[label="6] VACUUM - transport layer", shape=box, style=filled, color=green4, width=9]

W -> A -> F -> C -> I -> V

}

Using ERC: http://savannah.gnu.org/projects/erc/
[with erc-fill indentation set to 0]
and:
http://www.fourmilab.ch/stego/
[patched to prevent entry of newlines]
and the following code:
Usage:

./stego -e -t ~/experiment/crying/crying testfile testout ;; encode

./stego -d -t ~/experiment/crying/crying testout ;; decode

./stego -t ~/experiment/crying/crying -w dict ;; make dictionary

echo "waiting for rabbits" | ./stego -e -f dict - testout ;; encode with dictionary
Source: http://www.fourmilab.ch/stego/
tcpdump -i eth0 -s 1500 -w - | devdisplay 1500 100 (2008.02.12:1) |
NOW: 192.168.1.23. pass: admin. openwrt port 8080:
wired: 192.168.2.20
// essid: 10100 mode ad-hoc (not to use: xxxxx)
ipkg install kmod-usb-serial-ftdi
ipkg install kmod-usb-serial
insmod usbserial
insmod ftdi_sio
ls /dev/usb/tts/0
network
wl0_infra=0 for Ad Hoc
| nvram show | grep wifi |
| vram show | grep wl0 |
nvram set key=value
nvram commit
use orinoco card is best for adhoc
filesystem
put software in /home
Our script runs on boot if we make script:
#!/bin/sh /etc/rc.common
# Example script
# Copyright (C) 2007 OpenWrt.org

START=96
STOP=15

start() {
echo start
# commands to launch application
/home/mysendOSC -h 192.168.1.22 9999 &

}

stop() {
echo stop
# commands to kill application
}
as /etc/init.d/myosc
and then invoke:
/etc/init.d/myosc enable
The road to the transistor: http://www.jmargolin.com/history/trans.htm
Make a solar cell in your kitchen: http://scitoys.com/scitoys/scitoys/echem/echem2.html
Home-made SSI chips: http://www.velocityreviews.com/forums/t21718-homemade-ssi-chips.html
THE TRANSISTOR or SERENDIPITY and the SPACE AGE: http://www.smecc.org/cullen_moore.htm
How Do Transistors Work? http://amasci.com/amateur/transis.html
A Home-made Transistor: http://ourworld.compuserve.com/homepages/Andrew_Wylie/homemade.HTM
Point contact transistor: http://www.pbs.org/transistor/science/events/pointctrans.html
MOSIS IC fabrication: http://www.mosis.com/
1] StegFS (filesystem): http://www.mcdonald.org.uk/StegFS/
[ wbStego: http://wbstego.wbailer.com/ ]
Stepic (Python image steganography): http://domnit.org/2007/02/stepic
Forensic tools: http://unixsadm.blogspot.com/2007/10/digital-forensic-tools-imaging.html
Text-based steganography: http://www.siefkes.net/software/nlstego/
Steghide: http://steghide.sourceforge.net/
2] Using NLstego to embed text in another (generated according to the -m= model text) text (to encode and to decode):
Example encode:

cat svn_test/trunk/ludics_secret | java -Xmx400M -jar nlstego-0.9-dev.jar -m=experiment/crying/crying e > steg_test

Example decode:

cat steg_test |  java -Xmx400M -jar nlstego-0.9-dev.jar -m=experiment/crying/crying d
3] Using steghide to embed text in a bmp image:
steghide embed -cf conspire81bw.bmp -ef conspire.txt

and to decode:

steghide extract -sf conspire81bw.bmp
| par example: man -T steghide | ps2pdf - steghide.2.pdf |

1 Mhz to 8 Ghz Log Detector
Thanks to: http://f6bon.albert.free.fr/Milliwattmetre.html
1] On Debian Testing/Lenny:
apt-get install alsa-firmware-loaders
[also alsa-tools, lots of jack stuff]
... and compile firmware also by hand:
./configure --prefix=/usr
2] Jack and cat?
To be able to cat to each channel of soundcard:
PD: perhaps use piperead~ and pipewrite~ with jackd and adc~/dac~ 1 2 usw. TO TEST
Jack: apt-get install jack-tools from Rohan Drape: use perhaps of jack.plumbing
alsaplayer can be used to play to a certain channel but doesn't accept STDIN
ecasound:
| cat /dev/hda1 | ecasound -i stdin -o jack |
and then use jack_connect to assign. See for example:
http://www.nabble.com/ecasound,jack,lame-and-processing-finished-problem-t4305393.html
wrap this up for Emacs Lisp functionality
1] export from Kino as MPEG4 AVI single pass [btw. have to edit appropriate script in: /usr/share/kino/scripts/exports/ so that mp3 is libmp3lame to avoid halting at: "unknown encoder mp3"]
2] potentially use --force-smart on avidemux2_cli (in gneve.el)
after:
http://www.vlf.it/kurt/elf.html
receiving ELF waves in a frequency range between zero and approximately 25 Hz

various VLF receivers/EM sniffers:

1] Installation:
apt-get install mzscheme
darcs get http://www.slavepianos.org/rd/sw/rsc3/
cd rsc3; setup-plt; make; cd ..
cp -R rsc3 /usr/lib/plt/collects
2] in .emacs:
(add-to-list 'load-path "/root/rsc3/emacs")
(require 'rsc3)
3] in .rsc3.scm
(require (lib "rsc3.ss" "rsc3")
         (only (lib "process.ss") system))

(define s (open-udp* "127.0.0.1" 57110))

(define (boot*)
    (putenv "SC_PLUGIN_PATH"
            "/usr/lib/SuperCollider/plugins")
      (putenv "SC_SYNTHDEF_PATH"
              "/root/share/SuperCollider/synthdefs")
        (system "scsynth -u 57110 &")
          (sleep 0.5)
            (reset s))

(define (draw* g)
    (draw g "/tmp" "dotty"))


(putenv "SC_JACK_DEFAULT_INPUTS"
        "alsa_pcm:capture_1,alsa_pcm:capture_2")
(putenv "SC_JACK_DEFAULT_OUTPUTS"
        "alsa_pcm:playback_1,alsa_pcm:playback_2")
4] M-x rsc3-boot-scsynth [having started jackd as in previous post]
5] Testing:
;; (DiskIn numChannels rate bufnum)

;; Continously play a soundfile from disk. This requires a buffer to
;; be preloaded with one buffer size of sound.  The buffer size must
;; be a multiple of twice the synth block size. The default block size
;; is 64.

;; Note that DiskIn reads the number of outputs to create from what
;; looks like an input, but it is not an input, and cannot be set
;; using a control.

(let ((f "/root/testantenna.wav")
      (n 1))
  (->< s (/b_alloc 0 8192 n))
  (->< s (/b_read 0 f 0 -1 0 1))
  (play s (DiskIn n ar 0)))

(reset s)

(begin (->< s (/b_close 0))
       (->< s (/b_free 0)))

 (define analog-bubbles
      (let* ((a (MulAdd (LFSaw kr (Mce 8 7.23) 0) 3 80))
                       (b (MulAdd (LFSaw kr 0.4 0) 24 a)))
             (CombN (Mul (SinOsc ar (MIDICPS b) 0) 0.1) 0.2
                    0.2 4)))

 (play s analog-bubbles)
after: http://www.cs.brown.edu/pipermail/plt-scheme/2007-January/015947.html
1] jackd -Rv -d alsa 48000
2] emacs -nw
3] M-x sclang-start
3] evaluate:
(sclang-eval-expression "EvalListener.init")
(sclang-server-boot)
4] test in // SuperCollider Workspace:
s = Server.local;
SynthDef("mysynth", { Out.ar(0, PinkNoise.ar(0.25)) }).play(s);
s.freeAll
with C-c C-c after each expression
// no xruns
For the following: http://www.vlf.it/kurt/elf.html
40cm diameter. 1000 winds of 0.6mmm wire


1] Prc-tools:
http://linux.maruhn.com/sec/prc-tools.html
or:
http://packages.debian.org/sid/prc-tools-m68k/i386/download
2] SDK:
http://www.access-company.com/developers/downloads/index.html
moved directory:
mv sdk-5r3 /usr/local/share/palmdev/
3] Resource editor/compiler:
apt-get install pilrc
1] Default/factory IP address is: 192.168.1.220
192.168.1.1 is address after flashing with Alexei's image
Also note:
Asus products do not revert to a default IP address when in Failsafe Mode, but will instead use the address stored in NVRAM.
[see: http://wiki.openwrt.org/:/Hardware/Asus/Flashing ]
2] Flashing according to manual TFTP method [also pinging unit throughout seems to maintain connectivity]
3] Set wireless and wired details after notes on this page:
http://martybugs.net/wireless/openwrt/client.cgi
Fully featured, minimally decorated Emacs style window manager
http://www.nongnu.org/stumpwm/
1] Installed by way of instructions at:
http://stumpwm.antidesktop.net/cgi-bin/wiki/
2] Customised with C-z as main modifier keystrokes as per included ~/.stumpwmrc
3] Key bindings documented in bundled info file
//a selection
C-z ; - command mode (can TAB here)
C-z o - move between frames
C-z s - split horizontally (C-z Q - mazimize)
C-z C-s - open xterm
C-z n // p - cycle through windows
C-z w - show windows available
C-z number - goto window number x
C-z e - open GNU Emacs (graphical)
C-z k - kill window
... and many more
1] Using with Emacs 23.0.50.2 from CVS. Current w3m-el is not functioning so installed also from CVS.
2] Keystroke problems with Alt/Meta key and Delete key fixed respectively with:
XTerm.vt100.metaSendsEscape: true in ~/.Xdefaults
and:
(normal-erase-is-backspace-mode 0)
in .emacs
3] For CVS-Emacs to use Debian packages we use code as recommended on:
http://www.emacswiki.org/cgi-bin/wiki/
4] For some reason we have to explicitly set background in X rather than evilwm:
xsetroot -solid pink // in .xinitrc
5] zsh we set as default shell with chsh
1] Plot -> PDF route sometimes chops board - simply reposition on grid
2] Remember to mark tracks/pads which should be attached to the (GROUND) fill before filling the zone
1] code and board mistakes. remember - 22 is AGND, 21 AREF by 10 nF tied to GND, and 20 aVCC
see http://tuxgraphics.org/electronics/200705/article07051.shtml
Example code:
http://1010.co.uk/testserialin.c
[primarily for debugging scrying boards]
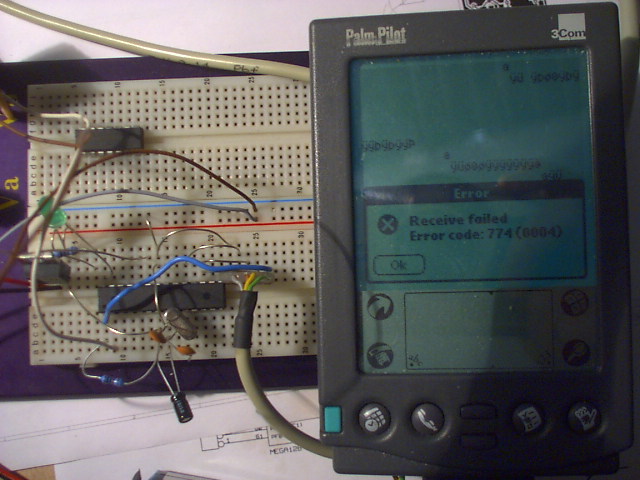
1] Using standard ATmega8 breadboarded (runs at 8MHz with external crystal) connected to Palm Pilot by way of DIY serial level convertor (MAX3232 - white cable here to pin3 (TXD)
2] Set fuse for external oscillator using the prg_fusebit_uc shell script - option -w 0 for external crystal
3] project home is ~/projects/scryer/avrscheme
4] swop over TX and RX as null modem for Palm - achieved in home-made gender changer!
Installation: http://www.tinyos.net/tinyos-2.x/doc/html/install-tinyos.html
Tutorial: http://www.tinyos.net/tinyos-2.x/doc/html/tutorial/lesson1.html
Note source is in /opt/tinyos-2.x
In PCBNEW:
PgUp and PgDn or Shift V to switch component/copper side when laying tracks and vias (to place via start on component side, drag track, right click to place via and then track continues on copper side)
F1 zoom in
F2 zoom out
F3 redraw (across also all kicad apps)
F4 centre at cursor
and further see also: http://xtronics.com/reference/kicad.html
TODO: check SMD sizes and quartz surface mount footprint
Notes:
1] Plenty of very useful libraries inc. for ATmega128 and the Hitachi 32Kx8 Static RAM: 62256 (also from Reichelt) at:
The ATmega128 at: http://library.oshec.org/library/avr.lib
62256: http://library.oshec.org/library/memory-hitachi.lib
2] Making and connecting buses:
From Kicad online help:
In fact, due to the repetition command (Insert key), connections can be very quickly made in the following way, if component pins are aligned in increasing order (a common case in practice on components such as memories, microprocessors…):
Place the first label (for example PCA0)
Use the repetition command as much as needed to place members. EESchema will automatically create the next labels (PCA1, PCA2…) vertically aligned, theorycally on the position of the other pins.
Draw the wire under the first label. Then use the repetition command to place the other wires under the labels.
If needed, place the bus entries by the same way (Place the first entry, then use the repetition command).
Which boils down to:
1] Using foggy/tracing paper (Artoz Perga Pastel) gives better results than Folie 3562 Overhead transparency when printed with laser printer (600 dpi) though latter can be used if fill in gaps. (SMD/T fine with five minutes below).
2] Warm-up UV lights (see pcb below) for two minutes. Switch off briefly and line up with ink facing PCB (in dim daylight is fine). Expose tracing paper for five minutes/ overhead transparency for two and a half to three minutes (heavy books on scanner/UV box lid). Develop for three to five in the Natriumhydroxid (Sodium Hydroxide I think (10g in 1000ml)). Wash in cold water. (above in dull light).
3] Now etching in Natriumpersulphat (Sodium Persulphate) which is faster, cleaner and more accurate. Dissolve 120g in 600ml water. Heat up in bath to 40 degrees or more. Etch board for around 15 minutes until copper vanishes - agitating as much as possible. Wash and dry boards and save solvent removal of UV paint until just before soldering.

1] When we export by way of plot option and then ps2pdf and then into GIMP the image is too small. We need to scale X and Y in the plot option to 1.08.
2] To test boards with three options:
a) latest foggy transparency paper
b) clear OHP film
c) foggy as diffuser and then with clear OHP film
... for SMT, double-sided, new VLF design, spectral boards (inc. TV transmitter)
Added data radio (encoder and decoder), osctrans/oscdump (making use of libOSC, dumpOSC and sendOSC) and devdisplay as an xxxxx module to pure:dyne:
https://devel.goto10.org/puredyne
see software for descriptions of these commandline applications.
Module is:
http://1010.co.uk/xxxxx.dyne (to add to a pure:dyne distribution mount -o loop the current iso, copy to a new directory the resulting directories, insert xxxxx.dyne into dyne/modules, mkisofs using the invocation of:
https://devel.goto10.org/puredyne/wiki/ - or just add to docked system)
Module was created at speed and with few problems (Fedora Core system unusable for dev system due to LVM/GRUB mismatch).
1] Set up development system according to:
https://devel.goto10.org/puredyne/wiki/
except refs to: mkdir cd /vol/hd1/puredyne-svn
and:
ln -s /vol/hd1/puredyne-svn/puredyne $DYNE_SYS_MNT/SDK/modules/pure
don't make sense but make the repository on the mounted drive and link accordingly to the right path
2] Create a new module and add software to the module according to:
https://devel.goto10.org/puredyne/wiki/
3] Create the ISO WITHOUT using dynesdk mkiso but manually using mount and mkisofs by way of customiso link above
4] xxxxx ISO is at: http://plot.bek.no/~crash2005/puredynexxxxx_april2007.iso
5] Module will be updated soon for xxxxx workflow: ATmega8/Atmel development apps, GNU Emacs extensions, promiscuOS, cur-rme usw.
1) Import the PDF into the Gimp (open and set resolution to 600). Manipulate and copy as required as a layer.
2) Print settings: Set Image to line and output to Black and White

Light documentation from workshop 21.04.07: workshops
1) UV apparatus constructed using gutted scanner with three 8W UV lights/lampe (Ersatz-UV-Roehren) from reichelt.de, three starters (from junked fluorescent tubes) and three 8W transformers from ebay.de.
useful link (see also below):
http://www.blafusel.de/misc/platine.html

2) Design laser photocopied from software-created original in this case onto diffuse transparent paper (milky). Completely transparent OHP material to be tested: (Avery Folie 3562 Reichelt again)

3) Design is placed with ink in contact with photo-sensitive (fotopositiv) PCB material from Conrad. Plastic protection is first peeled off - all of this process in near darkness. PCB is exposed for three minutes to UV light using a darkroom timer to time this.
4) Pre-mixed developer/entwickler (Natriumhydroxid from Conrad - 10g to 1 litre of 20 degree C water. Development time varies from three to five minutes as developer ages.
5) After development rinse in cold water and develop in etch solution (see: simple_pcb_guide for this part of the process.
6) Scrub off the yellow photo-resist with water and a brillo-pad and clean a bit with alcohol. The results:

for Gentoo... with GNU Emacs...
1] emerge scons
2] svn co https://svn.sourceforge.net/svnroot/supercollider/trunk SuperCollider3
3] cd SuperCollider3
4] scons PREFIX=/usr X11=no SCEL=yes LID=yes
5] scons install
6] in my .emacs:
(add-to-list 'load-path "/root/SuperCollider3/linux/scel/el")
(require 'sclang)
7] in my .bash_profile:
export SC_LIB_DIR=/usr/share/SuperCollider/SCClassLibrary
export SC_JACK_DEFAULT_INPUTS="alsa_pcm:capture_1,alsa_pcm:capture_2"
export SC_JACK_DEFAULT_OUTPUTS="alsa_pcm:playback_1,alsa_pcm:playback_2"
export SC_SYNTHDEF_PATH="./synthdefs"
8] start Emacs with emacs -sclang
9] sclang should be initialised and we see:
// =====================================================================
// SuperCollider Workspace
// =====================================================================
in the buffer and:
----:---F1 *SCLang:Workspace* All L5 (SCLang)------------------------------------
in the minibuffer. In this mode we can get help with C-x C-h m
10] change [ C-x C-b ] to scratch buffer and evaluate (C-x C-e after each line - the following):
   (sclang-start)
    (sclang-eval-expression "EvalListener.init")
    (sclang-server-boot)
first may not be necessary but...
11] switch back to our Sclang buffer and to test:
s = Server.local;

SynthDef("mysynth", { Out.ar(0, PinkNoise.ar(0.25)) }).play(s);

s.freeAll
Using C-c C-c to evaluate each line in turn...